Here it is! Part 4 of "The Dance Studio" project is finally here!!
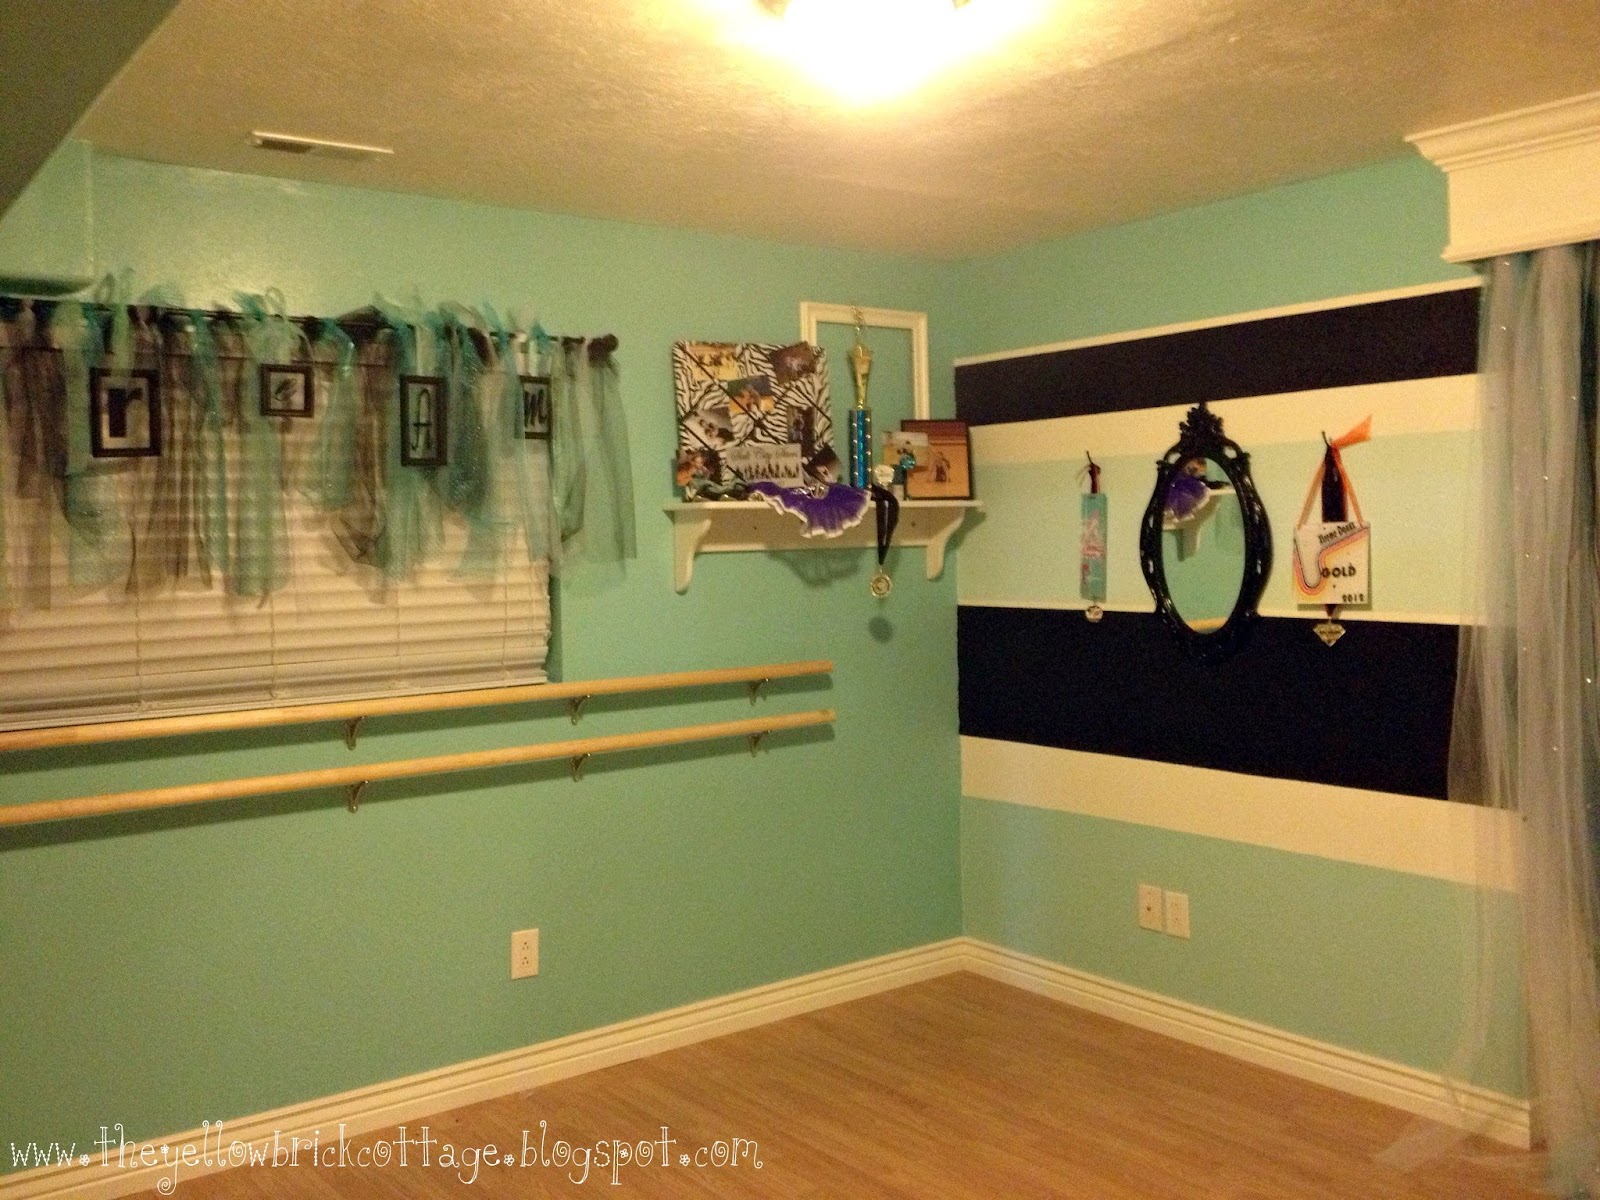
It's time for the big room reveal that I have been impatiently waiting for! On Christmas day, we finally finished our first "official" room in the house, a dance studio room for Diva:
It took two months to complete and a lot of work, but it turned out even better than I thought it would!

It all started with the realization that Diva literally had nowhere to practice her choreography, which became glaringly obvious one night when she accidentally stabbed me in the face with a prop and then hit herself in the head with the same prop trying to avoid the T.V. armoire and me as she attempted to practice with it.
As big as this house is, it is all ugly carpet upstairs, except for the equally ugly tile in the kitchen and that's taken up by the island. Not exactly ideal for turns.
{Can you tell I'm dying to rip that crap out the minute I get a chance?}
Anywhoo, we had to figure out how to get her some room to practice her leaps and turns. We thought we would try putting down a temporary dance floor in the unfinished area, but after pricing those out, we realized putting in an actual laminate floor was a lot cheaper and would actually work better. We just needed more of a defined space to put it in to keep it in place, so we ended up choosing what most people would consider the "catch-all" room (and ours truly lived up to the title). The room was large enough for some decent practice space and we didn't have to rip out any existing floors in order to install the new dance floor.
It wasn't too shabby of a starting point, except for the awful, gonna-make-me-puke wall color and the lack of...umm...a floor, barre, and mirror.
Oh, and this weird little characteristic came with it...

{No, I didn't rotate the picture, that's how the outlets are in the room. I'm guessing it was a mistake...or that we are supposed to stand on our heads whenever we go in there...}
Keep reading for the entire process including the awesome before and after shots:
So, the first step we took was to put some color that didn't resemble poop on those walls. Diva's favorite color at the moment is turqoise/teal so I went to Lowe's and grabbed a can of paint similar to the color of one of her favorite shirts and because I can't possibly paint like a normal person I decided stripes would be awesome. Luckily, I had coordinating colors left over from my kitchen and living room to use for the other colors. (Oh, and I added a little black paint that I already had on hand in there, too.)
By the way, did I mention that there must have been a "Buy one get four free cases of texture!" sale going on when that room was "finished" by the former residents? Either that, or someone got a little drunk before they textured the walls. I'm not sure. However, what I do know is that painting ultra-textured walls takes a lot more muscle and a lot more time (which I do not have the patience for). It also makes striping the walls a tad more difficult but then again so did the REALLY crooked walls that were possibly built by the crooked playhouse guys themselves.
Of course, I didn't let that stop me, though...Why make things easy for myself?? I went ahead and painted the walls white as my base color and then I got out the laser level and went to work. I used it to determine where my stripes would go and to make sure my lines were straight...Well, as straight as stripes on crooked walls can be...Originally, I traced the laser line with a pencil when I was drawing them, but after I lost the pencil for the hundredth time, I found it easier and more accurate to just use the laser as a guide and tape the wall that way. It worked for the most part, except for when I forgot to keep the laser level and double check it with an actual old-fashioned level, as you can see in the next pic:

...and several Diet Cokes later the taping was done...

I had decided to make my stripes varying in width, mostly because I had no plan and I didn't want to do math, but also I think I read that it's kind of the popular thing to do these days, so let's just go with that...

This was after I did the stripes the first time, you can probably see the bleed through. This occurred for two reasons: 1. Those damn textured walls and 2. I didn't check the strength of the tape I was using and picked one with less adhesive, meaning it wasn't super great at keeping the bleed through from happening (yes, I had never noticed there are different stickiness's of painter's tape before) .
Anyway, after seeing how the walls looked after I pulled the tape off, I was not exactly thrilled (I think I swore and then cried), especially since I had been working on them all night and was exhausted. It didn't help my mood when Studly, not exactly known for tactfulness, came in and the first thing out of his mouth was, "Oh, you have a little bleed through." This was NOT what I wanted to hear at 2 in the morning.
At first, I tried to ignore the crappy stripes because I was not too excited about redoing them. However, I realized it was always going to bug me if I left the walls like that so I ended up going to Sherwin-Williams to see if I could pick up any tips and the guy there really helped me out (I will most likely be buying all my paint from them in the future because of him.) He suggested that I use the green Frog Tape instead of the Scotch "Edge-Lock" tape that I had used because it had some type of barrier on the edges that Scotch didn't. The trick, he said was to apply it to the wall and then take a damp cloth or paper towel and rub it along the edges of the tape to "seal it" before painting over it. Then, he told me to make sure to take the tape off while the paint was still wet.
Let me just say, it worked like a charm! The walls looked 10 times better after the second time (even with their textured-hellness issues.)
The next project after painting the walls, was to build the closet nook that I had always wanted. Great for when Diva needs a little time away to be a pouty tween, or just hang out and it would also double as seating for me when I needed to watch her practice, without taking up any valuable floor space.

After the nook was complete, it was time for flooring.
Which is good considering this happened a few times while I was painting...
 |
| (Oops!) |
It didn't come with underlayment attached, so we bought it separately and because we were installing it in the basement, we also bought a moisture barrier to go under that.

 |
| That's what moisture barrier looks like, in case you were wondering. |
 |
| You can see the underlayment off to the right. It goes right on top of the moisture barrier. |
After the floors went in, my dad installed the baseboards next and then I puttied them with Painter's Putty rather than spackle, which works way better and is about the same price. A lot of professional painters actually prefer it over spackle. It still looks a lot like spackle on the shelf though, so you have to be careful to make sure you are getting the right product:


Before I started on the puttying and painting of the baseboards though, my dad showed me a trick to tape them off, in case I happened to drip while near the baseboard, It's a little more work, but I think it's better than just relying on a drop cloth that can shift and move around, which you also have to keep from bumping into the newly painted baseboard .
Aside from taping off both top and bottom, you add a "second layer" by taping some brown painter's paper (it's about 12 inches wide) to the tape that you have already taped against the bottom of the baseboard. I did it in both colors, so you can see the difference:

After I finished painting the baseboards, we were FINALLY ready to install the mirror and barre, which ended up happening on Christmas Eve.


Finding a mirror was a little more difficult. After seeing that the sizes of the mirrors at Lowe's were way too small, I called around to a bunch of local glass companies, but for the size of mirror I wanted, it was about $200 for a 4X6 piece, which was out of my budget range. Luckily, we also checked Home Depot and they had a little bit bigger size of a mirror than Lowe's, which was a 3X5 and it was only $59. We used clips to attach it to the wall, in order to allow us to move it later. I am hoping that one day I will be able to get a bigger mirror, but this one works for now.

VOILA!
We officially had a mini dance studio!
Now for everyone's favorite part of room makeovers...
The Before and After Shots....
Now for everyone's favorite part of room makeovers...
The Before and After Shots....
(taken by my crappy camera until I lost it, with the rest taken on my crappy phone.)
Before:

After:


The "Gallery Wall":
Before:

After:


Details:
I hung the ballerina silhouette (which was an award from a competition) along with some of my favorite pictures of Diva that I had taken at some competitions. I also wrapped ribbon and fabric around the empty frames (burning the hell out of my fingers several times while securing them with the glue gun) to make the wall look more interesting.
For the "Dancer" sign, I painted chipboard letters from Hobby Lobby in black acrylic paint and then covered them with scrapbook paper before the paint was dry {I would have used Mod Podge but my bottle happened to be Mod Podged shut and I couldn't get it open for the life of me}. After the paper had dried to the letters, I took a razor blade and traced them. Then I glued the flowers on them ( you can find them in the scrap booking section at Hobby Lobby. They come in several pieces in a box or tube and are called "Spare Parts.").
The poster was taken at her dance studio by a local photographer in Salt Lake City who specializes in sports action shots.
The wall with the barre:
Before:


After:


Details:
I made the curtains for the window the same way I made the ones for the nook. I had looked everywhere for curtains that were short enough, because panels would have interfered with the barre. We already had the "DREAM" letters and I threw them on the curtain rod there just to make it interesting. The shelf was built by Studly's dad when Diva was born (I need to find new plugs for the screws, so you can't see them.) I found a tutu from her very first costume and tap shoes (look how tiny her feet were!) and put them up there with her first crown, a trophy, and some more dance pictures. I carried the empty frame theme to the shelf, too.
The Closet Nook Wall:
Before:


After:


Details:
I didn't want to completely cover those stripes that had totally kicked my butt, so I just hung a couple of awards on the side of the mirror. I think the scale is off a little, but I'm sure I'll come up with something better if I ever have the energy again.The mirror was a salvage. Originally, it was gold and lived in my Great Grandma's house. One day when I was at my dad's, I saw it just leaning up against a basement wall asked him if I could have it. He had planned on taking it to the dump (WHAT??). I used it as part of the decor in Diva's room in the townhouse we lived in for a couple of years and thought it would look great in the dance room, too. I love that mirror.
To see how we made the cornice, you can click here to go to part 2 and for information on the no-sew curtains, go to Part 1.
To see how we made the cornice, you can click here to go to part 2 and for information on the no-sew curtains, go to Part 1.
Before:

After:
 |
| You can't tell in this picture, but in the blue frame on the bottom shelf is a ballet shoe from her very first pair. |

 |
| There I am, tying her tap shoes for her very first recital... |
Details:
For some reason the room had two door ways. One led to the unfinished area next to the stairs and the other led to the back of the hallway. Totally weird. The door to the hallway was also quite a bit more narrow and it had this weird little entry-hall. Because we needed some shelves to hold her trophies and other keepsakes, we decided to block that door off and screw it shut and then anchor an Ikea book case to the wood above the door to keep it from falling over. It's nice to have it a little recessed and not sticking out onto the floor, so she won't accidentally run into it, or knock something off of it while she is dancing.
The wall with the mirror:
Before:


After:


And there you have it!
I love the entire room, but I think my number one favorite thing is the print that I had my cousin make for her that hangs above the mirror. It's actually a digital adaptation of a painting that my grandfather, an extremely gifted oil painter painted. (He passed away of Alzheimers a few years ago.)
Here is a picture taken of the original painting:

Here is a closer look at what my cousin came up with after I told her I wanted a tribute to the original one. I loved it so much, I had her make another one for my niece.

Seriously, she's amazing, right?
By the way, she does all sorts of other cool stuff, too. She even makes cute, custom purses and bags. In fact, she just made one of those for me and a dance bag for Diva. So, if you are looking for some really cool custom graphic style art, a bag, or other cool stuff, check her out at www.jaymerebecca.com. or her Etsy shop.
Linked up to:


I can tell a lot of hard work went into this room. I am sure she LOVES it! Good luck getting her out of there :)
ReplyDeleteThanks!
DeleteThe room looks AMAZING! Love it!
ReplyDeleteLooking good! That's one lucky little Diva! Thanks for following housebyhoff, following you back! :)
ReplyDeleteThank you so much for the follow back! It's always nice to meet new blog friends!
Delete